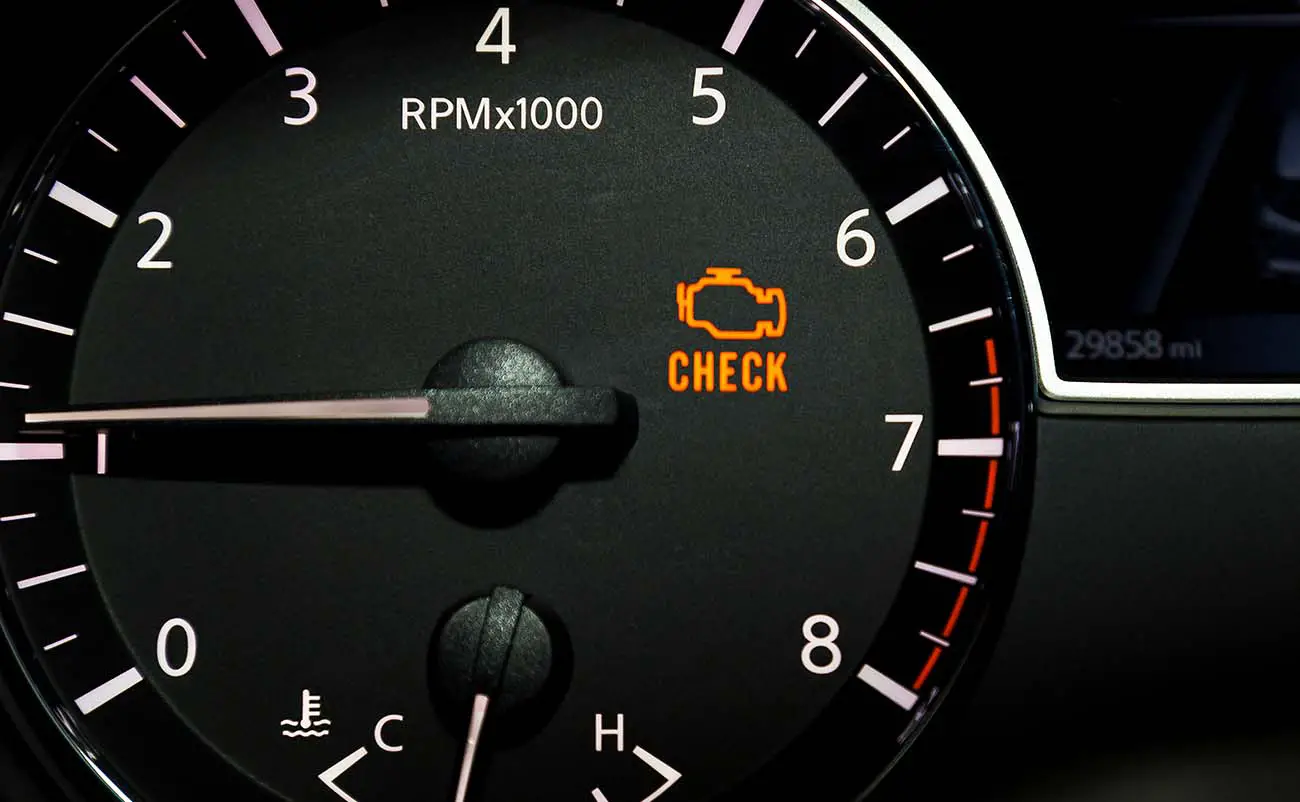
Few things are more frustrating than seeing the Check Engine Light illuminate on your dashboard. You immediately start to worry that your car is about to break down, and you can’t help but think about how much it will cost to fix it. A mechanic might be needed to even diagnose the problem, and then there is the repair bill on top of that. Do you wish you could just reset the light on your own and keep driving? We will give you five easy ways that you can reset your check engine light, and we’ll tell you how to make sure that it doesn’t come back on. Keep reading to get all the details.
Table of Contents
How To Reset Your Check Engine Light
You don’t always need to visit the dealership to reset the check engine light in your vehicle. There are a few ways that you can easily reset the light on your own, and some of them don’t even require any special tools. Here is how you can get the light in your car to shut off.
— Disconnect The Car Battery
This is one of the easiest methods for resetting your check engine light. All you need to do is disconnect the connector on the negative terminal of your battery. This is the connector with the black cap, and always make sure you wear safety glasses when working with the battery. Leave the negative battery cable disconnected for about 30 seconds to ensure that all the stored power drains from your car’s computer. This will clear the trouble codes from the computer. Once the codes are gone, then the check engine light will disappear as well. This method does have a drawback, though. If your vehicle still has a problem that needs to be repaired, the light is likely to come back on pretty quickly. So, you still need to fix the problem causing the light to illuminate.
— Remove The Fuse
If removing the battery cable is too difficult, then you might choose to simply remove the fuse associated with your ECU. You should be able to find the proper fuse by looking in your owner’s manual. This will essentially accomplish the same task as disconnecting the battery terminal. When you pull the fuse, power will no longer be supplied to your car’s computer. Once it loses power, then it will also lose its memory. Doing so will cause the check engine light to go off.
— Let It Go Off On Its Own
In many cases, you don’t need to do anything at all to get that pesky warning light to go off. If the light is illuminated due to a one-time issue like a misfire, then it will go off on its own fairly quickly. Just keep driving like normal and wait for it to go off. Usually, the light should go off within a day or two. If it doesn’t, then you probably have an ongoing issue that will need to be repaired.
— Turn The Car Off And On A Few Times
Turning the car on and off a few times effectively performs a hard reset on the vehicle’s computer, and it will usually cause your check engine light to go away. The error codes should be cleared from the vehicle’s computer, and you should not see the check engine light on the dashboard anymore. However, just like we previously mentioned, the light will continue to come on if your vehicle has a problem that is causing an error code as it runs. If this is the case, then the light will stay on until the root of the issue is fixed.
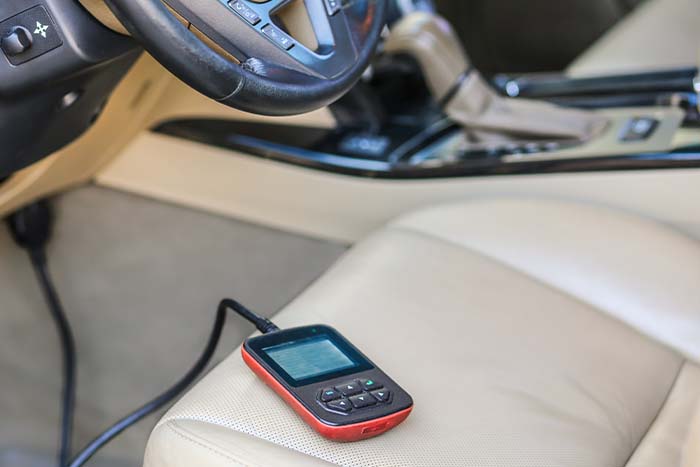
— Use An OBD Scanner Tool
This is usually the most effective method for clearing your check engine light because it allows you to see what is causing the light to come on. However, this method requires the use of an OBD II scan tool. Simply plug the tool into the OBD2 onboard diagnostic OBD port on your vehicle. It is usually located under the dash on the driver’s side of the vehicle. Once it is plugged in, turn the ignition on and use the tool to read the error codes and clear the light. Many auto parts stores will perform this task for you at no charge and assist with troubleshooting if you don’t have accessibility to one of these tools.
Why Is Your Check Engine Light On?
So, now that you know how to reset your check engine light, what is causing the light to come on in the first place? There are a number of issues that can cause the light to show up, but here are the most common ones.
— Loose Gas Cap
This is a common cause of a warning light, and it is also an easy fix. This should be one of the first things that you check when you see the light on your dash. If you do not replace the gas cap after filling up your tank, then the light will definitely come on. In some cases, failure to tighten it enough will also make the light show up. So, check your gas cap and make sure that it is completely tight. If this was the problem, then the light should go away on its own pretty quickly after tightening the cap.
— Faulty O2 Sensor
A bad O2 sensor will not only make you fail an emissions test, but it will also set off your check engine light. Since these sensors measure the amount of oxygen at different points in your car’s exhaust system, a faulty sensor makes your vehicle aware that something is not working properly. Usually, you can diagnose this problem pretty easily with a scan tool, although you might need a mechanic to replace the sensor. Thankfully, this repair is much cheaper than the cost of a catalytic converter replacement!
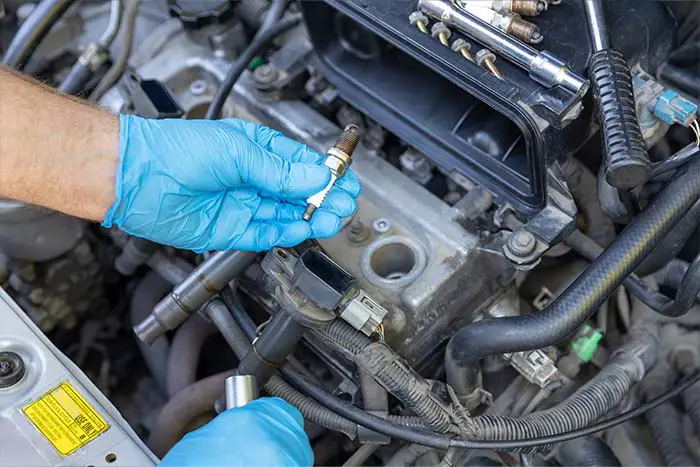
— Bad Spark Plugs
If your ignition system is not firing properly, that will cause a check engine light right away. Old spark plugs eventually stop firing properly, and that causes problems. Thankfully, spark plug replacement cost is not that expensive. You can often find service specials at your local service center for spark plug replacement. Many people choose to take the DIY route and replace spark plugs on their own since it is not a difficult job.
— Engine Misfiring
If you hear your engine pinging or feel it skipping, then you will probably see the check engine light soon. Your engine fires anywhere from hundreds to thousands of times per minute, and just a couple of misfires can cause your check engine light to come on. These misfires could be caused by a number of different things, but regardless of the cause, the check engine light will come on.
— Clogged Catalytic Converter
A clogged catalytic converter will quickly cause the check engine light to appear. The sensors in your exhaust system measure oxygen levels in the exhaust gasses. If the catalytic converter becomes clogged, then these sensors will be quick to identify the problem. Once these measurements get outside of the spec, then it will cause the check engine light to illuminate. In some cases, you can run a bottle of catalytic converter cleaner through your vehicle to see if the light goes off.
Diagnose And Repair Your Issue
So, how do you find out exactly which issue is causing your check engine light to stay on, and how do you repair it so that the light doesn’t come back? The first step is making sure that you know the cause of the problem. You will need to use a scan tool to read the error codes from your vehicle to find out the cause of the problem. The codes stored in your car’s computer will tell you exactly what caused the light to come on.
You can then use those codes to get to the root of the problem. If the code relates to a misfire, then you might need to perform further diagnosis. You may end up changing the spark plugs and wires and cleaning your fuel injectors before finally solving the problem. You could also schedule service at your local repair shop if necessary to help you correctly diagnose the problem so that you are not spending money on unnecessary repairs.
The Bottom Line
When you see that check engine light appear in your vehicle, making it disappear can be as simple as removing the negative cable from the battery for a few seconds. If your vehicle has an ongoing issue, then the light will come back on if you do not repair the root cause of the issue. Use a scan tool to help diagnose the problem, and then you can keep that light from coming back on.
Frequently Asked Questions
Can I reset my own check engine light?
Yes, you can reset your own check engine light. There are a few different ways you can do this. First, you can reset the light by disconnecting your negative battery cable for a few seconds. You could also remove the fuse that connects to your car’s ECU or turn your car on and off a few times. Using a scan tool is also a great way to reset the light and read the error codes at the same time.
How long does it take for a check engine light to reset?
The time it takes depends on the method used. You can reset the light within a matter of minutes by disconnecting the battery or using a scan tool. However, it usually takes longer if you just wait for the light to reset on its own. In that case, it might stay on for a couple of days before going away. If the problem that caused the light is not fixed, then the light will stay on until the issue is resolved.
Does a code in a check engine light mean anything?
Yes, the code helps you diagnose the problem. The code stored with a check engine light is the computer’s way of telling you what went wrong to cause the light to come on. For instance, it might signal a misfire in a particular cylinder. The code could also point you to a faulty O2 sensor or some other issue. These error codes are the starting point for diagnosing the problem with your car.
Can you reset the check engine light without disconnecting the battery?
Yes, there are a couple of other ways to reset the light. You could pull the fuse that goes to the ECU or turn your car on and off a few times. The best way to reset the light is to use an OBD-II scan tool. This tool will allow you to read the trouble codes as well as reset the light.
I constantly spend half an hour each day reading this blog’s content daily along with a cup of coffee. Keep it up guys!